
Let’s get this out of the way first: Chocolate Chip Cookie Protein Balls exist for those moments when your brain screams “COOKIE DOUGH!” but your goals whisper “maybe… protein?” If you’ve ever stood in front of the fridge debating whether to eat raw cookie dough with a spoon (no judgment) or stick to something more balanced, this recipe was made for you.
These little bites hit that nostalgic, chocolate-studded cookie dough flavor hard—while still keeping things smart, satisfying, and snackable. No oven. No mixer drama. No waiting for cookies to cool while you hover like a gremlin. Just mix, roll, chill, dip, and boom: protein-packed bliss.
IMO, this is the kind of recipe that quietly becomes part of your weekly routine. You make it once “just to try,” and suddenly you’re doubling the batch and hiding a few in the back of the fridge like a snack squirrel. Ready? Let’s talk about why these deserve a permanent spot in your kitchen.
Why You’ll Love These Chocolate Chip Cookie Protein Balls
You know when a recipe checks all the boxes? Flavor, ease, nutrition, flexibility? This is that recipe.
Here’s why people get obsessed:
- Ridiculously easy – No baking, no special skills, no stress. If you can stir, you can make these.
- Legit cookie dough flavor – Not “healthy-ish” cookie dough. Real-deal vibes.
- Protein-packed and filling – These actually satisfy, not just tease your hunger.
- Perfect for meal prep – Make once, snack all week.
- Totally customizable – Vegan? Nut-free? Lower sugar? You’ve got options.
FYI, these aren’t one of those snacks that leaves you rummaging through the pantry 20 minutes later. Thanks to protein, healthy fats, and fiber, they hold you over like a champ.
The Story Behind This Cookie Dough Protein Balls Recipe
This Cookie Dough Protein Balls Recipe was born from a very relatable problem: loving cookie dough but not loving the crash that follows. I wanted something that felt indulgent but worked with real-life routines—busy mornings, post-workout hunger, afternoon slumps, and late-night sweet cravings.
After testing countless versions (some too dry, some too sticky, some… let’s not talk about them), this one nailed it. The texture is soft but rollable. The sweetness hits without being overpowering. And the chocolate coating? Non-negotiable. It takes these from “nice snack” to “wow, who made these?”
Ingredients Breakdown (What Each One Does)
Every ingredient here has a job. No fillers. No weird stuff.
Dry Ingredients
- Almond flour – Creates that classic cookie dough texture and adds fiber.
- Vanilla protein powder – Boosts protein and enhances the dessert-like flavor.
- Pinch of salt – Tiny amount, big impact. Makes everything taste better.
Wet Ingredients
- Cashew butter – Creamy, mild, and perfect for cookie dough vibes.
- Milk (dairy or non-dairy) – Brings the dough together. Add gradually.
- Honey or maple syrup – Natural sweetness without going overboard.
- Vanilla extract – Cookie dough’s best friend.
The Fun Stuff
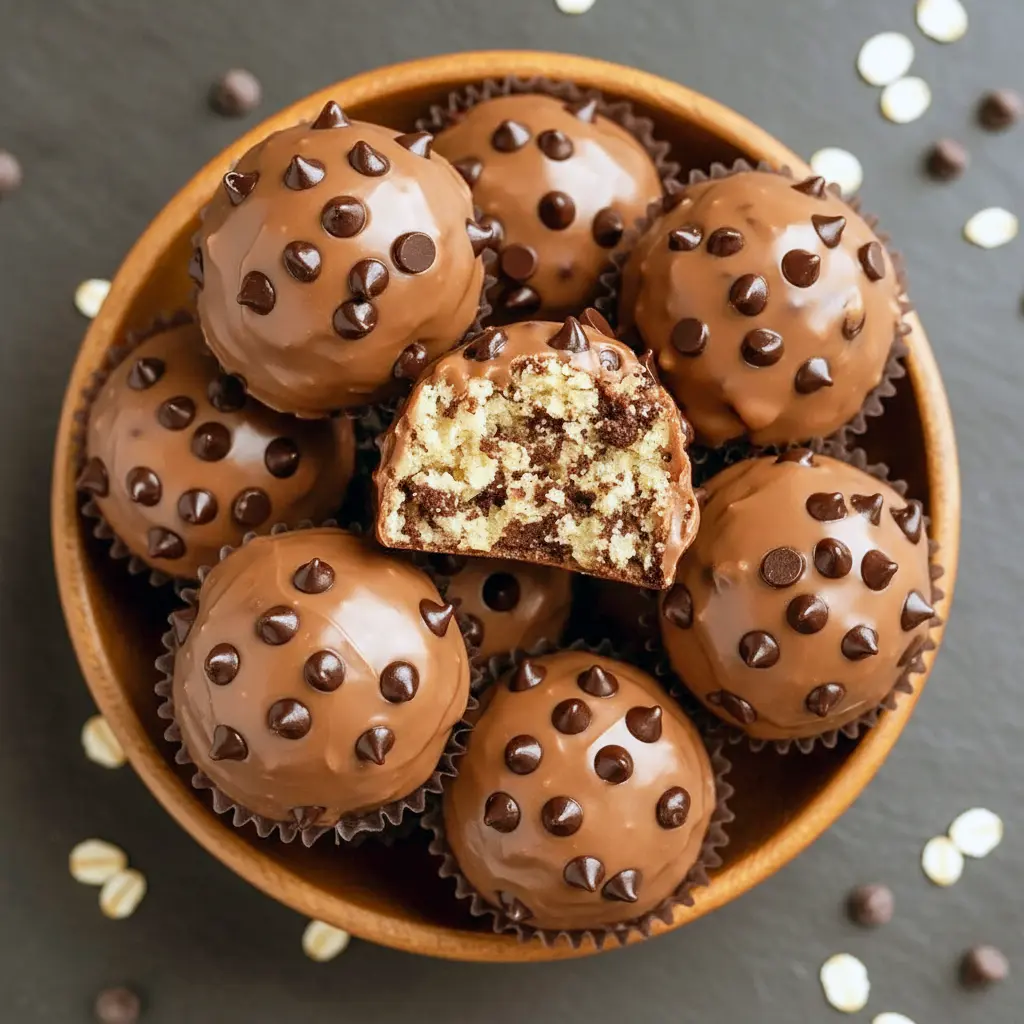
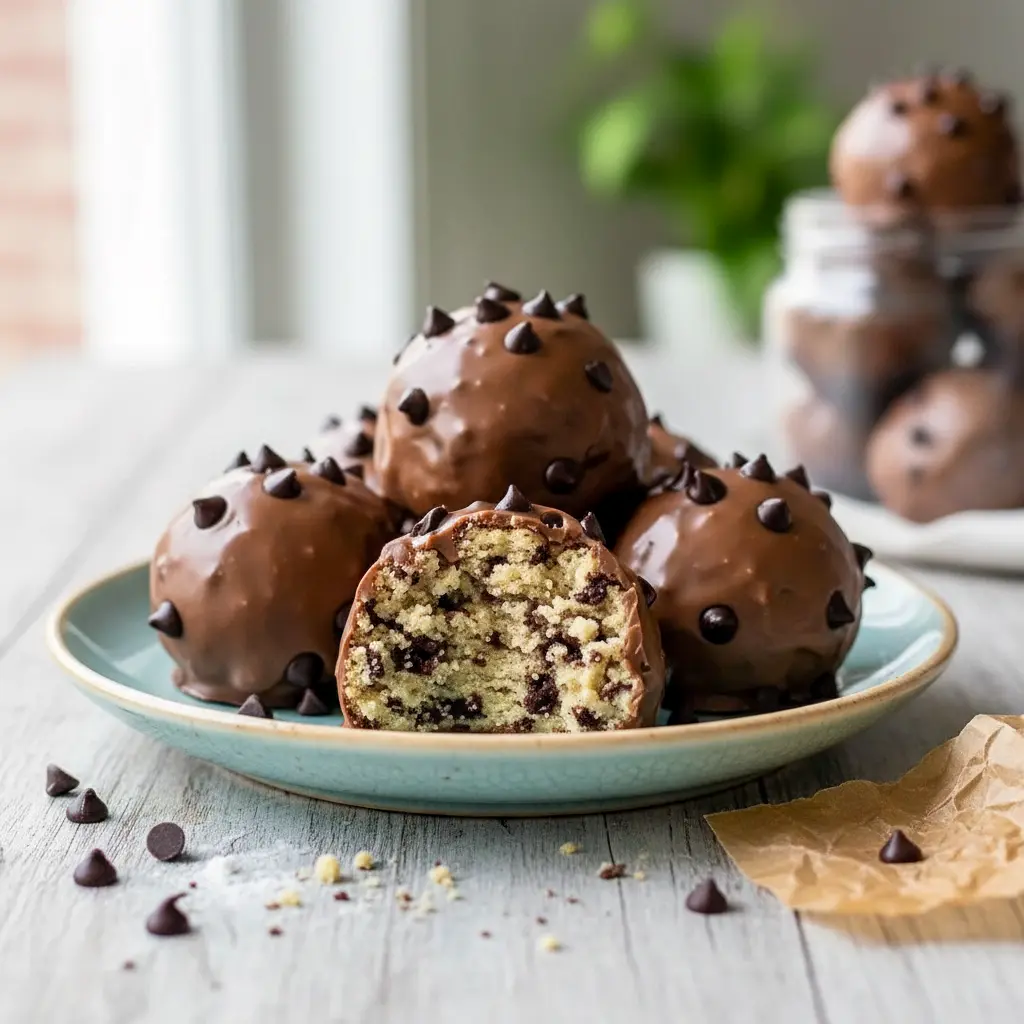
- Mini chocolate chips – Even distribution = chocolate in every bite.
- Milk chocolate chips + coconut oil – For that smooth, glossy coating.
Key Tip: Use vanilla protein powder. Chocolate protein powder sounds tempting but changes the flavor profile completely.
Recipe Snapshot (Because We Love a Quick Overview)
- Prep Time: 20 minutes
- Chill Time: 30 minutes
- Total Time: About 50 minutes
- Yield: 12–15 balls
- Difficulty: Easy-peasy
Perfect for beginners, busy humans, and anyone who hates washing extra dishes.
How to Make Protein Balls Chocolate Chip Style (Step by Step)
Step 1: Mix the Dry Ingredients
Grab a medium bowl and whisk together almond flour, vanilla protein powder, and salt. This ensures even distribution and prevents clumps later.
Step 2: Stir the Wet Ingredients
In another bowl, mix cashew butter, milk (start with 2 tablespoons), honey or maple syrup, and vanilla until smooth.
Step 3: Combine
Pour the wet mixture into the dry ingredients. Stir until a dough forms.
Step 4: Fold in Chocolate Chips
Gently fold in the mini chips. Try not to “overmix”—you want those chocolate pockets intact.
Step 5: Adjust the Texture
If it feels crumbly, add milk one teaspoon at a time. The dough should be slightly sticky but easy to roll.
Step 6: Roll
Roll into 1-inch balls and place on parchment paper.
Step 7: Chill
Refrigerate for at least 30 minutes. Don’t skip this. Chilling = structure.
Step 8: Melt the Chocolate
Microwave chocolate chips and coconut oil in 30-second intervals, stirring between each round.
Step 9: Dip
Dip each ball into the chocolate. Let excess drip off using a fork.
Step 10: Set
Sprinkle extra mini chips on top and chill again until set.
Boom. You just made Chocolate Chip Protein Bites that look bakery-level fancy.
Pro Tips for Perfect Results (Don’t Skip These)
- Chill before dipping – Warm dough + melted chocolate = mess.
- Add liquid slowly – Too much milk = sticky chaos.
- Use quality chocolate – It matters, especially for the coating.
- Taste before rolling – Adjust sweetness early.
Bold Truth: Most protein snacks fail because they rush the texture. Take your time here—it pays off.
Variations to Try (Because Options Are Everything)
Want to mix it up? These adapt beautifully.
- Vegan version – Use plant-based protein, dairy-free milk, and vegan chocolate.
- Nut-free – Swap cashew butter for sunflower seed butter.
- Lower sugar – Reduce honey or use a sugar-free alternative.
- Flavor twist – Add cinnamon, espresso powder, or even a pinch of sea salt.
You can even turn these into Cookie Dough Energy Balls by skipping the chocolate coating for a faster snack.
Serving Ideas You’ll Actually Use
These aren’t just “grab-and-go” snacks—though they crush that role.
- Post-workout fuel
- Afternoon pick-me-up
- Healthy dessert
- Lunchbox treat
- Party platter surprise
Pair them with iced coffee, cold milk, or herbal tea. Trust me.
Health Benefits (Yes, These Actually Have Them)
Let’s talk nutrition without getting boring.
- High protein – Helps with satiety and muscle recovery.
- Healthy fats – From nut butter for sustained energy.
- Fiber-rich – Supports digestion and fullness.
- Balanced macros – No sugar spike, no crash.
Compared to traditional cookie dough, these Chocolate Chip Protein Energy Balls are a serious upgrade.
Storage & Make-Ahead Tips
- Store in an airtight container in the fridge for up to 7 days.
- Freeze for 2–3 months for long-term snacking.
- No reheating needed—eat straight from the fridge.
Meal-prep win? Absolutely.
FAQs (Because You’re Probably Wondering)
Can I use oat flour instead of almond flour?
Yes! Texture will be slightly different but still delicious.
What if I don’t have protein powder?
You can sub more flour, but you’ll lose the protein boost.
Can I use dark chocolate?
100%. Great if you prefer less sweetness.
My dough is too dry—help!
Add milk slowly until it holds together.
More Protein Ball Ideas You’ll Love
If you like these, you’ll probably also enjoy Cookies And Cream Protein Balls, classic Cookie Protein Balls, or even no-bake Chocolate Chip Protein Balls without the coating for faster prep.
Final Thoughts: Your New Favorite Healthy Indulgence
These Chocolate Chip Cookie Protein Balls prove that healthy snacks don’t have to feel like a compromise. They’re rich, satisfying, and dangerously easy to make. Whether you call them Protein Balls Chocolate Chip, Chocolate Chip Protein Bites, or just “those amazing cookie things,” one thing’s certain—they disappear fast.
So go ahead. Make a batch. Hide a few for yourself. And enjoy every bite without the guilt. Print

Irresistible Chocolate Chip Cookie Protein Balls Everyone Craves
- Total Time: 50 minutes
- Yield: 12–15 protein balls 1x
Description
If cookie dough is your weakness but you still want a snack that works with your goals, these no-bake protein balls are about to become your go-to. They’re soft in the center, studded with mini chocolate chips, and finished with a smooth chocolate shell that makes them feel downright indulgent. Best part? No oven, no mixer, and they’re ideal for prepping ahead for the week.
Ingredients
Cookie Dough Centers
- 1 cup almond flour (Oat flour works if you prefer a slightly heartier texture)
- ½ cup vanilla protein powder (whey, casein, or plant-based)
- ¼ cup cashew butter (Almond butter or sunflower seed butter are great swaps)
- 2–3 tablespoons milk of choice
- ¼ cup mini chocolate chips, plus extra for topping
- 2 tablespoons honey or maple syrup
- 1 teaspoon vanilla extract
- Small pinch of salt
Chocolate Shell
- 1 cup milk chocolate chips
- 1 teaspoon coconut oil or neutral vegetable oil
Instructions
- Stir the Dry Base: Add the almond flour, vanilla protein powder, and salt to a mixing bowl. Whisk until evenly combined and lump-free.
- Blend the Wet Ingredients: In a separate bowl, mix together the cashew butter, honey or maple syrup, vanilla extract, and 2 tablespoons of milk. Stir until creamy and smooth.
- Bring It Together: Pour the wet mixture into the dry ingredients and mix until a dough begins to form.
- Add the Chocolate Chips: Fold in the mini chocolate chips, distributing them evenly throughout the dough.
- Fine-Tune the Texture: If the dough feels crumbly, add more milk a teaspoon at a time until it becomes slightly tacky but still easy to roll.
- Roll the Bites: Scoop and roll the dough into 1-inch balls. Place them on a parchment-lined plate or tray.
- Chill: Refrigerate the dough balls for at least 30 minutes so they firm up.
- Melt the Chocolate: Combine chocolate chips and coconut oil in a microwave-safe bowl. Heat in 30-second bursts, stirring between each, until fully melted and smooth.
- Coat the Protein Balls: Dip each chilled ball into the melted chocolate, letting excess drip off before placing it back on the parchment.
- Finish and Set: Sprinkle extra mini chocolate chips on top while the coating is still wet. Chill again for 15–20 minutes, or until the chocolate hardens.
- Enjoy or Store: Serve straight from the fridge for the best texture.
Notes
- Protein powder matters: Vanilla-flavored protein powder gives the most authentic cookie dough taste.
- Nut butter choice: Cashew butter creates the smoothest dough, but almond and sunflower seed butter work well too.
- Chocolate coating tip: Adding oil helps the chocolate melt smoothly and set with a glossy finish.
- Make it vegan: Use plant-based protein, non-dairy milk, and dairy-free chocolate chips.
- Storage: Keep refrigerated in an airtight container for up to 7 days, or freeze for longer storage.
- Prep Time: 20 minutes
- Cook Time: 30 minutes
- Category: Desserts
Nutrition
- Serving Size: 1 ball
- Calories: 120
- Sugar: 5 g
- Sodium: 40 mg
- Fat: 7 g
- Saturated Fat: 3 g
- Unsaturated Fat: 4 g
- Trans Fat: 0 g
- Carbohydrates: 10 g
- Fiber: 1 g
- Protein: 5 g
- Cholesterol: 2 mg


