
Biscoff Brownies are the kind of dessert that make people pause mid-bite and say, “Wait…what is in this?” And honestly? That’s the reaction we’re going for. These brownies are rich, ultra-fudgy, unapologetically decadent, and layered with deep caramelized spice from Biscoff cookies and cookie butter. If brownies and cookie butter had a love child, this would be it.
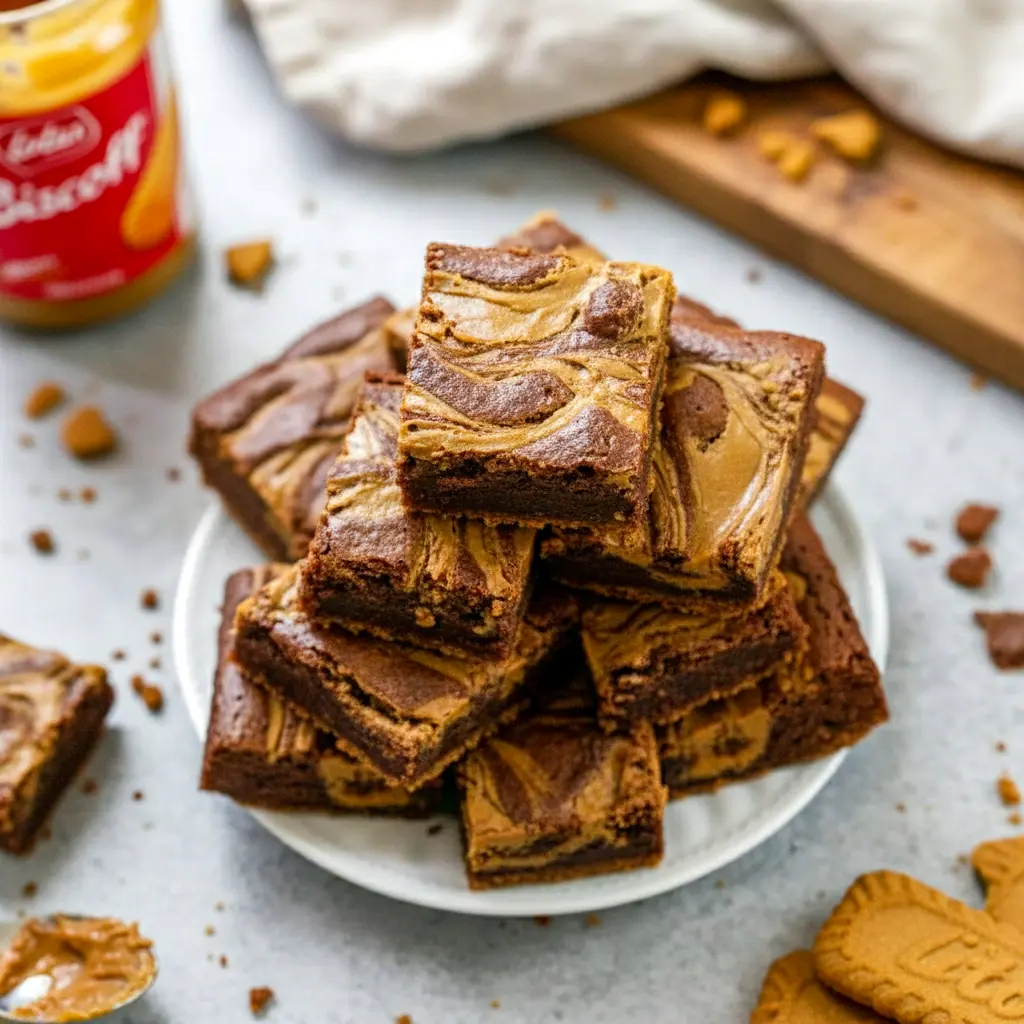
Picture this: a buttery Biscoff cookie crust, a dense chocolate brownie center, and glossy Biscoff swirls melting into every corner. Crunchy on top. Gooey in the middle. Slightly chewy at the edges. Basically, brownie perfection. IMO, these aren’t just brownies—they’re an experience.
So if you’re into bold desserts, dramatic swirls, and recipes that disappear faster than you can say “seconds, please,” you’re in the right place.
Why You’ll Love These Biscoff Brownies
Let’s not bury the lede. These brownies slap. Hard.
First, the texture. You get that coveted crackly top that shatters ever so slightly when you bite in. Underneath? A fudgy interior that stays rich without tipping into underbaked territory. Add the cookie butter swirl and suddenly you’re dealing with layers of flavor that feel bakery-level fancy without being fussy.
Second, the flavor payoff. Baking with Biscoff brings warm notes of caramel, cinnamon, and spice that pair ridiculously well with chocolate. It’s cozy and indulgent at the same time. Think brownies with a glow-up.
Third, they’re a crowd-pleaser. Potluck? Bake sale? Casual Tuesday night when you “accidentally” need dessert? These Cookie Butter Brownies deliver every single time.
And finally, they’re flexible. Allergies? Swaps? Doubling the batch? We’ll cover all that. FYI, these brownies are forgiving—but they still reward a little attention to detail.
The Story Behind These Brownies (AKA Recipe Testing Real Talk)
I wish I could say I nailed these on the first try. I did not.
It took multiple rounds of testing to get the crust just right and the cookie butter swirl looking dramatic instead of messy. The biggest lesson? Texture matters more than you think. Especially with the crust.
Biscoff cookies must be crushed into an ultra-fine crumb. Not “mostly crushed.” Not “rustic.” Fine. Like sand at the beach. Anything chunkier and the crust refuses to cooperate. It won’t pack evenly, and you’ll lose that clean, sturdy base.
The swirl was another learning curve. Cold cookie butter doesn’t swirl—it fights back. Overheated cookie butter turns into a puddle. The sweet spot? Five to ten seconds in the microwave. Just enough to loosen it so you can create those swoopy Biscoff swirls that look bakery-worthy.
After a few batches (and many brownies sacrificed for science), this version became the one. The recipe I reach for when I want guaranteed success and zero leftovers.
Ingredients Breakdown: What Each One Brings to the Party
Every ingredient here has a job. No freeloaders.
Biscoff Cookie Crumbs
These form the base. Finely crushed cookies pack down into a firm, buttery crust that adds crunch and spice. This is one of those Biscoff cookie recipes where texture truly matters.
Salted Butter
Butter adds richness and moisture. Salted butter helps balance the sweetness, especially with the cookie butter swirl. If you’re using unsalted, add a pinch of salt.
Granulated Sugar + Brown Sugar
This combo is the secret to that shiny, crackly top. Granulated sugar helps form the meringue-like crust, while brown sugar adds moisture and depth.
Eggs
Eggs do the heavy lifting here. Whipped properly, they trap air and help create that crinkled brownie top everyone obsesses over.
Cocoa Powder
Use unsweetened cocoa powder. Dutch-processed or natural both work, but don’t swap in hot chocolate mix. That’s chaos.
All-Purpose Flour
Just enough to give structure without turning these brownies cakey. Measure carefully.
Vanilla Extract
Optional, but recommended. It rounds out the chocolate and enhances the overall flavor.
Biscoff Cookie Spread
The star. The swirl. The drama. This is where Biscoff spread recipes easy really shine. Warm it slightly and swirl with confidence.
How to Get That Perfect Crackly Top (Yes, It Matters)
Let’s talk about the brownie top. Because if it doesn’t crinkle, are we even trying?
That shiny, papery crust comes from whipping air into the eggs and sugar. You’re essentially creating a thin layer of meringue that floats to the surface while baking. Science is delicious.
Here’s the move:
- Whip the eggs first until they’re pale and slightly thick.
- Gradually add the sugar while mixing.
- Keep whipping until the mixture looks glossy and creamy.
A hand mixer makes this easy, but you can do it by hand if you’re feeling ambitious. Just know your arm will feel it the next day.
Do not rush this step. It’s the difference between “nice brownies” and “wow, what bakery are these from?”
Step-by-Step: How to Make These Cookie Butter Brownies
This process is straightforward, but each step builds flavor and texture. Take your time.
Step 1: Prep the Pan and Crust
Crush your Biscoff cookies into a fine crumb. Mix with melted butter and press firmly into a lined metal pan. Pack it down. Really commit. Bake briefly to set.
Step 2: Whip Eggs and Sugar
In a large bowl, whip the eggs until foamy, then add sugars and beat until thick, pale, and glossy. This step sets the tone for the entire bake.
Step 3: Build the Batter
Fold in melted butter, cocoa powder, vanilla, and flour. Mix gently. Overmixing here kills the fudgy vibe.
Step 4: Assemble
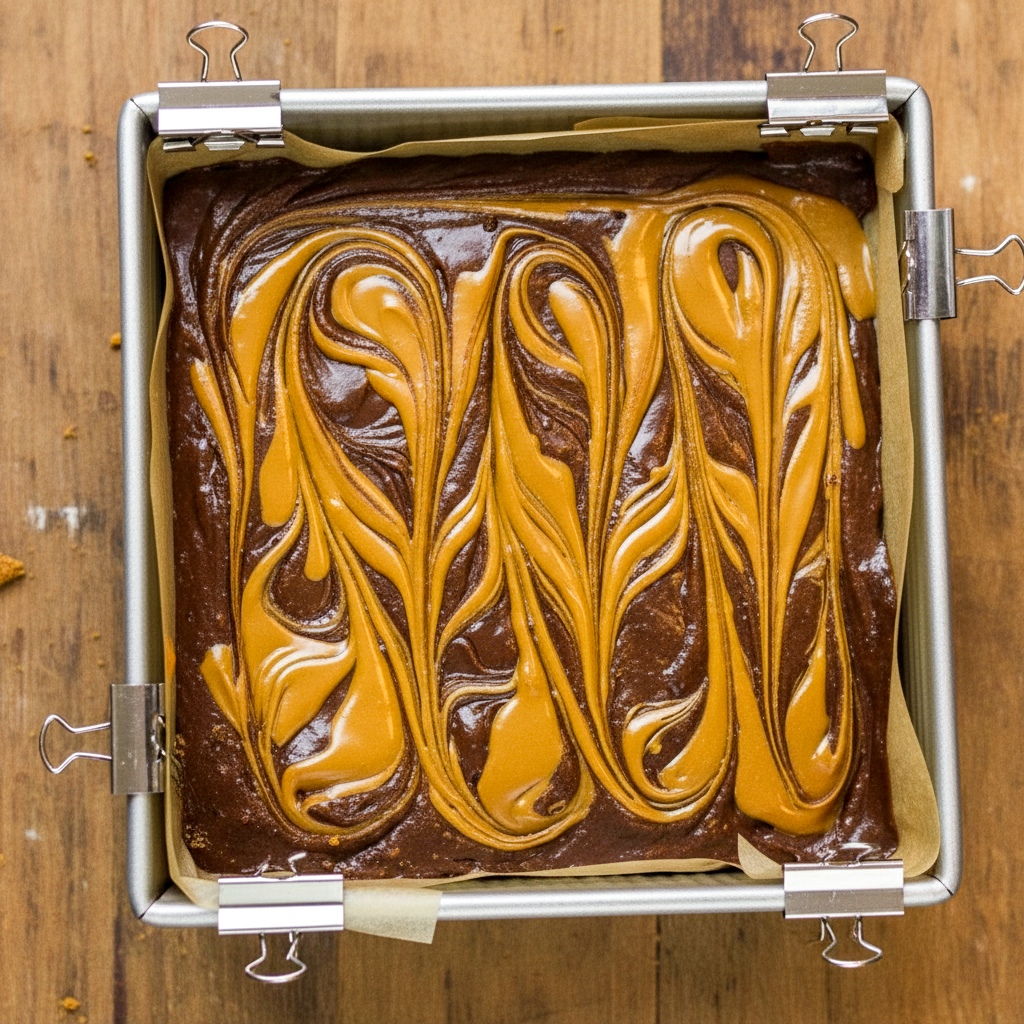
Pour the batter over the crust and smooth the top. Warm your cookie butter slightly and dollop it over the surface. Swirl gently with a knife.
Step 5: Bake
Bake in a metal pan until the edges are set and the center still has a slight jiggle. Overbaking is the enemy.
Step 6: Cool (Yes, You Have To)
Chill the brownies before slicing. Warm brownies are delicious, but they won’t cut cleanly. Patience pays off.
Pro Tips for Bakery-Level Results
Use a metal pan. Glass runs hot and can overbake the edges.
Room temperature ingredients mix better. Cold eggs don’t whip as well.
Don’t overheat the cookie butter. Five to ten seconds is plenty.
Chill before slicing. Cleaner cuts, better texture.
Use a hot knife for slicing. Dip, wipe, slice. Repeat.
These small details elevate your brownies from good to unforgettable.
Variations to Try (Because Options Are Fun)
Want to mix things up? Here are a few ideas.
- Biscoff Cookie Bars: Bake in a larger pan and slice thinner for party-ready bars.
- Nutty Twist: Add chopped pecans or hazelnuts for crunch.
- Gluten-Free Option: Swap in a 1:1 gluten-free flour blend.
- Egg-Free Version: Use flax eggs for a plant-based spin.
- Extra Swirl: Add a second swirl halfway through baking for dramatic layers.
These brownies are flexible without losing their soul.
Best Ways to Serve These Biscoff Cookie Butter Desserts
Warm with vanilla ice cream? Elite.
Chilled straight from the fridge? Surprisingly incredible.
Drizzled with extra melted cookie butter? Dangerous but worth it.
Serve them as-is or dress them up. Either way, they steal the show.
Storage and Make-Ahead Tips
These brownies keep well at room temperature for up to three days in an airtight container.
For longer storage, freeze them uncut until firm, then wrap tightly. They’ll keep for up to two months. Thaw overnight in the fridge and enjoy like new.
They’re actually even fudgier on day two. Just saying.
FAQs About Baking With Biscoff
Can I double the recipe?
Yes. Use a 9×13-inch pan and bake slightly longer.
Can I skip the crust?
You can, but the crust adds texture and structure. Highly recommended.
Is Biscoff the same as cookie butter?
Biscoff is a brand of cookie butter. Any similar spread works, but the flavor may vary.
Why didn’t my brownies get a crackly top?
Most likely the eggs and sugar weren’t whipped enough. That step is crucial.
Final Thoughts: Are These Worth Making?
Absolutely. These Biscoff Brownies hit every note: fudgy, crunchy, gooey, and deeply flavorful. They’re indulgent without being over-the-top and impressive without being complicated.
If you love Biscoff spread ideas, rich chocolate desserts, or brownies that actually live up to the hype, this recipe deserves a permanent spot in your rotation.
Bake them once, and don’t be surprised if people start requesting them by name. That’s just how it goes. Print

Fudgy Biscoff Brownies with Gooey Cookie Butter Swirls
- Total Time: 40 minutes
- Yield: 16 servings 1x
Description
These indulgent brownies lean hard into rich chocolate flavor with layers of spiced cookie butter goodness. A pressed Biscoff cookie base adds crunch, while a smooth cookie butter swirl melts into the batter for gooey bites throughout.
Ingredients
Cookie Crumb Base
- 1½ cups finely ground Biscoff cookies (about 20 cookies / 155 g)
- ¼ cup salted butter, melted and slightly cooled (56 g)
Brownie Batter
- 2 large eggs, brought to room temperature (112 g)
- ½ cup white sugar (100 g)
- ½ cup light brown sugar, packed (100 g)
- ½ cup salted butter, melted and cooled (113 g)
- 2 teaspoons vanilla extract or vanilla bean paste (8 g)
- ½ cup all-purpose flour (65 g)
- ⅓ cup unsweetened cocoa powder (33 g)
- ¼ teaspoon baking powder (just over 1 g)
- ⅓ cup smooth Biscoff cookie butter (80 g)
Instructions
- Prep the Pan: Heat your oven to 350°F (175°C). Line an 8-inch baking pan with parchment paper, allowing extra to hang over the sides for easy removal later.
- Make the Crust: Combine the crushed Biscoff cookies with melted butter until evenly moistened. Press the mixture firmly into the bottom of the prepared pan, smoothing it out with the back of a spoon. Set aside.
- Whip the Eggs and Sugar: In a large mixing bowl, beat the eggs, granulated sugar, and brown sugar on high speed for about 1 minute. The mixture should turn pale, thick, and slightly fluffy.
- Add Butter and Vanilla: Pour in the melted butter and vanilla. Mix on medium speed just until incorporated.
- Incorporate Dry Ingredients: Sift the flour, cocoa powder, and baking powder directly into the bowl. Gently fold everything together with a spatula until no dry streaks remain.
- Assemble the Brownies: Spoon the brownie batter over the prepared cookie crust and spread evenly.
- Create the Cookie Butter Swirl: Warm the Biscoff spread in the microwave for 5–10 seconds until just loosened. Drop spoonfuls over the batter, then drag a butter knife through the surface to form swirls.
- Bake: Bake for 22–25 minutes, until the edges are set and a toothpick inserted in the center comes out with a few moist crumbs. Ovens vary, but around 23 minutes is often ideal.
- Cool Completely: Remove from the oven and let the brownies cool fully in the pan before slicing.
Notes
- Make Ahead & Storage
- Store brownies in an airtight container at room temperature for up to 3 days.
- For longer storage, freeze uncut brownies until firm, then wrap tightly in plastic wrap and foil. Freeze up to 2 months.
- Thaw overnight in the refrigerator before serving.
- Scaling the Recipe
- To make a larger batch, double all ingredients and bake in a 9×13-inch pan.
- Bake at 350°F for 25–30 minutes, checking for doneness near the center.
- Best Results Every Time
- Room-temperature ingredients blend more smoothly.
- Metal pans work best for even baking; glass pans may require lowering the oven temperature to 325°F.
- Beat the eggs and sugar well to achieve that classic shiny, crackly brownie top.
- Chill before slicing for clean edges and neat squares.
- For bakery-style cuts, slice with a warm, dry knife and clean the blade between cuts.
- Egg-Free Option
- Replace the eggs with two flaxseed eggs to make these brownies eggless without sacrificing structure.
- Prep Time: 15 minutes
- Cook Time: 25 minutes
- Category: Desserts
Nutrition
- Serving Size: 1 serving
- Calories: 315 kcal
- Sugar: 19 g
- Sodium: 169 mg
- Fat: 19 g
- Saturated Fat: 7 g
- Unsaturated Fat: 11 g
- Trans Fat: 1 g
- Carbohydrates: 34 g
- Fiber: 1 g
- Protein: 3 g
- Cholesterol: 51 mg


