
There’s something wildly nostalgic about Peanut Butter & Jelly meeting warm, mashed bananas in the same bowl. The first time I stirred those familiar spreads into what would become my favorite Flavored Banana Bread, I felt like I’d cracked some secret code of comfort food.
It started in my mother’s kitchen.
I mashed bananas with a fork, probably a little too enthusiastically. She leaned on the counter, watching me swirl peanut butter into the golden mash. When I added jelly, she raised an eyebrow… then smiled. One bite later, we both knew this wasn’t just another Quickbread Recipe.
It was memory baked into a loaf pan.
And today? I’m sharing that feeling with you.
A Brief Introduction to This Recipe
This isn’t just banana bread.
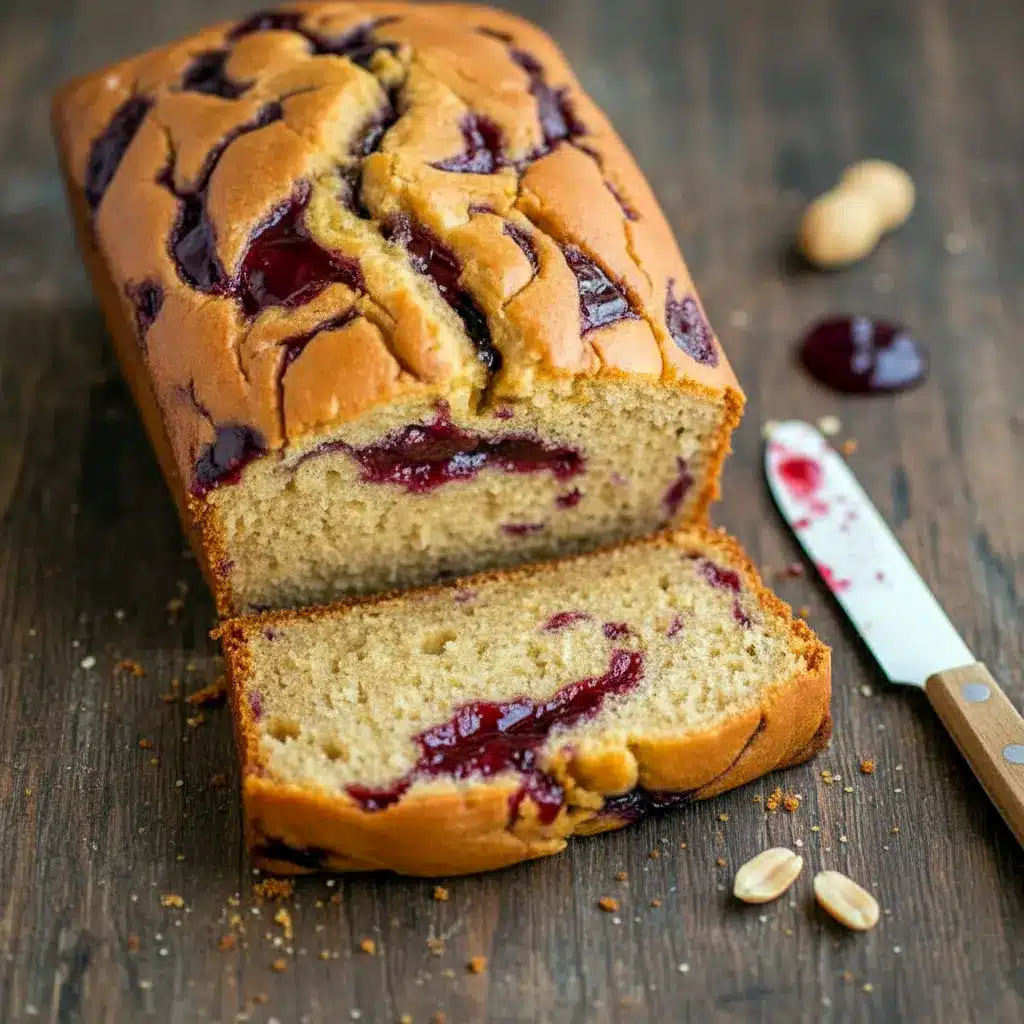
This is Peanut Butter & Jelly Flavored Banana Bread that tastes like your favorite childhood sandwich grew up and got sophisticated. It’s soft, tender, slightly nutty, and ribboned with jammy sweetness in every slice.
It works as a Breakfast Loaf Bread, a midday snack, or an Easy Dessert Bread when you need something sweet but low effort.
No stand mixer.
No complicated steps.
No culinary gymnastics.
Just real ingredients and bold flavor.
If you’ve been hunting for creative Sweet Bread Ideas, this one belongs at the top of your list.
Why You’ll Love This Recipe
Let’s break it down.
You’ll love this loaf because:
- It’s incredibly moist thanks to ripe bananas.
- The peanut butter adds richness without overpowering.
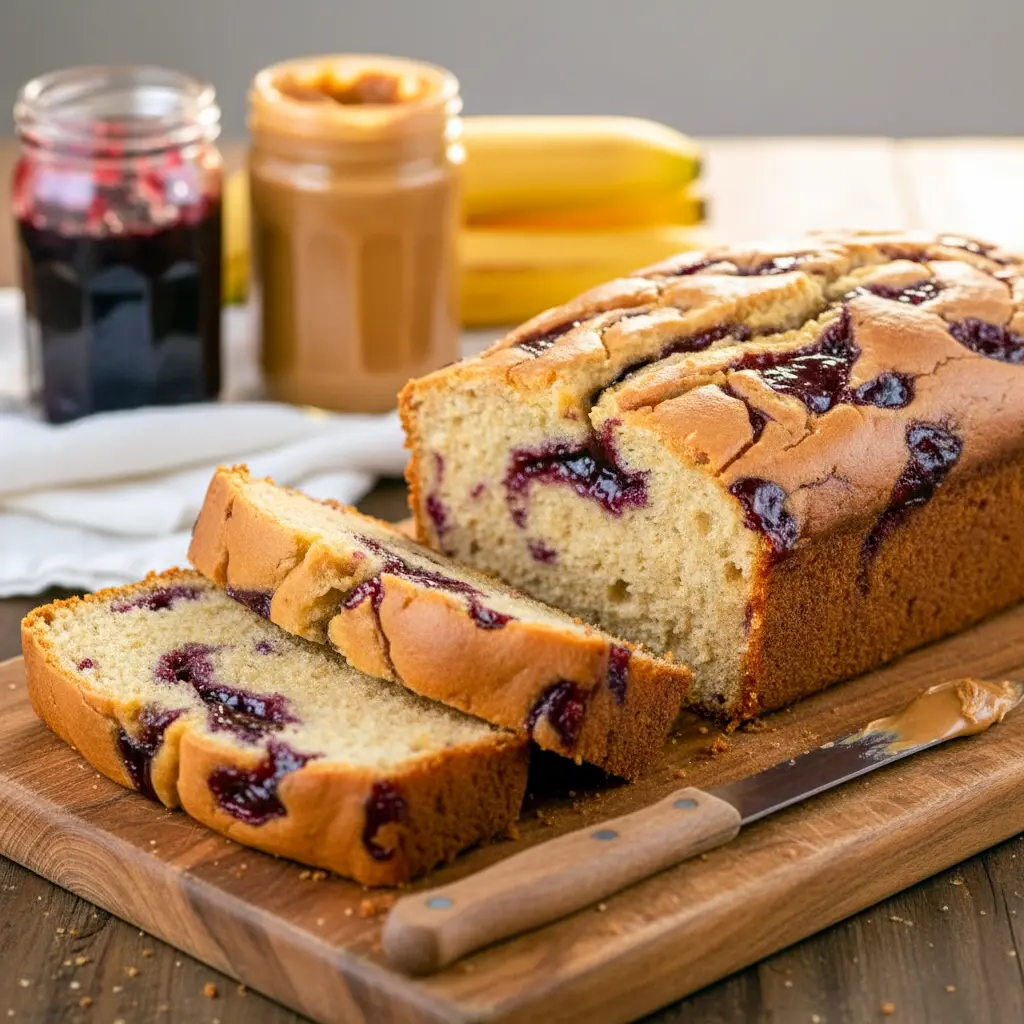
- Jam swirls create pockets of sweet-tart magic.
- It’s a true Quickbread Recipe — no yeast, no waiting.
- It doubles as a Sliced Bread Dessert or breakfast.
And honestly? It feels fancy without trying too hard.
Ever want something that tastes indulgent but still feels homey? That’s this bread.
It’s the kind of bake that makes people pause mid-bite and say, “Wait… what IS this?”
The Story Behind This Bread
I spent many afternoons flipping through my grandmother’s worn recipe cards. The edges curled. The ink faded. But the ideas? Timeless.
I wanted to merge my favorite childhood sandwich with her classic banana loaf.
She didn’t hand me a written formula. She told me to trust my instincts.
So I mashed ripe bananas by hand.
I stirred peanut butter in slowly.
I added jelly like I was decorating a masterpiece.
The first loaf came out slightly uneven. The jam sank too far. The top cracked dramatically.
But when we sliced it?
Magic.
That first bite tasted like school lunches, sticky fingers, and carefree mornings. It shaped how I approach baking to this day. Food should feel joyful. It should tell a story.
And this Peanut Butter & Jelly creation tells mine.
Ingredients Breakdown: Why Each One Matters
Every ingredient plays a role. No filler. No fluff.
Ripe Bananas
Use bananas with plenty of brown spots. They mash easily and deliver natural sweetness. Ripe bananas = better flavor and texture. Don’t settle for green-tinged fruit.
Creamy Peanut Butter
Smooth peanut butter blends seamlessly. It creates richness without heaviness. Want crunch? Go for crunchy. But IMO, smooth keeps the crumb tender.
Jelly or Jam
Grape gives you that classic Peanut Butter & Jelly nostalgia. Strawberry adds brightness. Thicker jams create bold swirls. Thinner ones sink deeper into the loaf.
Granulated Sugar
Just enough to enhance sweetness without overpowering the bananas.
Melted Butter
Adds richness and depth. Oil works, but butter wins in flavor.
Egg
Binds everything together. Simple but essential.
Vanilla Extract
Adds warmth and rounds out the nutty notes.
Flour, Baking Soda, Salt
The structure trio. Flour builds the loaf. Baking soda lifts it. Salt sharpens flavor.
These ingredients come together to create one of the most comforting Fruit Bread Recipes Loaf Pan bakers can make.
How to Make It (Step-by-Step)
This process stays simple and intentional.
Step 1: Preheat and Prepare
Heat your oven to 350°F. Grease your loaf pan thoroughly. A well-prepared pan prevents sticking disasters.
Step 2: Mash the Bananas
Use a fork. Keep it rustic. Mash until mostly smooth with a few small lumps.
Step 3: Mix the Wet Ingredients
Stir peanut butter into the bananas. Add melted butter and sugar. Mix until cohesive. Add egg and vanilla. Stir until smooth.
You’ll notice the mixture thickens slightly. That’s perfect.
Step 4: Combine the Dry Ingredients
Whisk flour, baking soda, and salt in a separate bowl. This step ensures even distribution.
Step 5: Combine Wet and Dry
Fold dry ingredients into the wet mixture gently. Do not overmix. Stop when no dry streaks remain.
Overmixing creates dense bread. We want tender.
Step 6: Layer and Swirl
Spread half the batter into the pan. Add spoonfuls of jam. Swirl lightly with a knife.
Add remaining batter. Top with more jam. Swirl again.
Resist over-swirling. Bold ribbons look prettier and taste better.
Step 7: Bake
Bake for about 55–60 minutes. Check at 50 minutes. Insert a toothpick in the center. If it comes out clean or with a few moist crumbs, you’re good.
Let the loaf rest in the pan for 10 minutes before transferring to a wire rack.
Your kitchen will smell ridiculous. Fair warning.
Texture and Flavor Notes
Fresh from the oven, you’ll smell banana first.
As it cools, peanut butter deepens and becomes more prominent.
Each slice gives:
- Tender crumb
- Nutty richness
- Jammy sweetness
- Balanced saltiness
The texture hits that sweet spot between fluffy and dense. Not cake. Not sandwich bread. Something better.
Warm slices feel almost gooey where the jam concentrates. Once fully cooled, the loaf slices cleanly and works beautifully as a Sliced Bread Dessert.
Ever toasted a slice lightly and added a tiny smear of butter?
Dangerous. In the best way.
Pro Tips for Perfect Results
Let’s tighten this up with some bakery-level insight.
Use overripe bananas.
More brown spots = better sweetness and moisture.
Measure flour correctly.
Spoon and level. Don’t scoop aggressively.
Avoid overmixing.
Stir until just combined. Then stop.
Swirl gently.
Overworking jam blends it into the batter instead of creating ribbons.
Check early.
Ovens vary. Start checking at 50 minutes.
FYI, slightly underbaked is better than overbaked. The loaf continues to set as it cools.
Variations to Try
Want to personalize it? Go for it.
- Add chocolate chips for extra indulgence.
- Toss in chopped peanuts for crunch.
- Swap peanut butter for almond butter.
- Use homemade berry jam for sharper contrast.
- Sprinkle coarse sugar on top for texture.
You can also turn this into mini loaves. They make adorable gifts and bake faster.
This recipe fits beautifully into creative Recipes Using Bread when you think beyond standard slices.
Best Ways to Serve
This bread shines in multiple roles.
Serve it:
- Slightly warm with coffee.
- Toasted with a smear of butter.
- As a sweet brunch addition.
- With fresh berries on the side.
- As a late-night snack straight from the cutting board.
It’s versatile enough to sit alongside other Sweet Bread Ideas at brunch.
And yes, it qualifies as an Easy Dessert Bread when topped with a scoop of vanilla ice cream. Don’t argue with me on this.
Storage and Leftovers
Wrap the cooled loaf tightly in plastic wrap. Store at room temperature for up to 3 days.
For longer storage, slice and freeze individually. Use freezer-safe bags.
To reheat, thaw at room temp or warm gently in a toaster oven.
Freezing preserves moisture beautifully.
This trick saves busy mornings when you need a quick Breakfast Loaf Bread without extra effort.
Frequently Asked Questions
Can I reduce the sugar?
Yes. Ripe bananas already provide sweetness. Reduce slightly if desired.
Can I make it gluten-free?
Substitute a 1:1 gluten-free flour blend. Texture may vary slightly.
Can I use natural peanut butter?
Yes, but stir it thoroughly first. Excess oil separation can affect texture.
Why did my jam sink?
Your jam may be too thin. Use thicker jam or layer batter more evenly.
Is this a dessert or breakfast?
Both. It sits comfortably between a cozy Flavored Banana Bread and indulgent treat.
Why Your Kitchen Needs This Bread
Let’s be honest.
We all crave recipes that feel nostalgic but still practical.
This loaf bridges that gap effortlessly.
It’s familiar.
It’s comforting.
It’s just unexpected enough to feel special.
When guests visit, this bread sparks conversation instantly. The visible jam swirls invite curiosity.
“Is that… peanut butter and jelly?”
Yes. Yes it is.
And it’s glorious.
Among classic Fruit Bread Recipes Loaf Pan, this one stands out because it taps into collective memory. Everyone has a PB&J story.
Why not bake yours into a loaf?
My Childhood Takeaway
My grandmother’s kitchen wasn’t pristine. Flour dusted the counters. Sticky spoons lingered in the sink.
But it felt alive.
That spirit carries into every loaf I bake today.
When I slice this Peanut Butter & Jelly Flavored Banana Bread for my daughter before school, I see that same grin I once had.
Traditions evolve. Flavors blend. Kitchens change.
But comfort? That stays constant.
And if you’re searching for a Quickbread Recipe that delivers nostalgia, flavor, and ease in one pan, you’ve found it.
Now tell me — are you team grape or strawberry? Print
Decadent Peanut Butter & Jelly Flavored Banana Bread – Perfect Breakfast Loaf
- Total Time: 1 hour 15 minutes
Description
This peanut butter and jelly–inspired banana loaf brings together two comfort food classics in one soft, tender bake. Creamy peanut butter melts into the banana base, while ribbons of jam create eye-catching swirls and sweet, fruity pockets throughout each slice.
Ingredients
For the Banana Loaf
- 3 very ripe bananas, thoroughly mashed
- 1/3 cup smooth peanut butter
- 1/2 cup granulated sugar
- 1/4 cup butter, melted and slightly cooled
- 1 teaspoon pure vanilla extract
- 1 large egg
- 1 1/2 cups all-purpose flour
- 1 teaspoon baking soda
- 1/4 teaspoon fine salt
For the Jam Ribbon
- 1/4 cup jam or jelly (grape, strawberry, or preferred flavor)
Instructions
- Mix the Base Batter
- Set your oven to 350°F (175°C). Lightly coat a 9×5-inch loaf pan with butter or nonstick spray.
- Place the mashed bananas in a large bowl and mash until mostly smooth. Add the peanut butter, sugar, melted butter, vanilla extract, and egg. Stir until the mixture looks creamy and evenly blended.
- In a separate bowl, combine the flour, baking soda, and salt. Stir the dry ingredients together to distribute the leavening evenly. Add the dry mixture into the banana mixture in stages, folding gently just until no visible flour remains. Avoid overmixing to keep the bread tender.
- Create the First Swirl Layer
- Transfer half of the batter into the prepared loaf pan and spread it evenly across the bottom.
- Drop small spoonfuls of jam over the surface. With the tip of a knife or a skewer, lightly drag through the batter to form visible streaks. Keep the motion gentle so the jam doesn’t fully blend in.
- Add the Final Layer
- Spread the remaining batter over the first layer, smoothing the top with a spatula.
- Spoon additional jam over the surface and repeat the swirling motion. Aim for distinct ribbons to achieve that marbled look once baked.
- Bake to Perfection
- Place the loaf in the oven and bake for approximately 50 to 60 minutes. Check doneness by inserting a toothpick into the center; it should come out clean or with just a few moist crumbs attached.
- Let the bread rest in the pan for about 10 minutes. Then carefully remove it and allow it to cool completely on a wire rack before slicing.
Notes
- Choose a thicker jam if you want clearly defined swirls rather than blended streaks.
- Allow the loaf to cool fully before cutting to help it firm up and slice cleanly.
- For added texture, try crunchy peanut butter or a sprinkle of chopped nuts.
- Prep Time: 15 minutes
- Cook Time: 1 hour
- Category: Breakfast
Nutrition
- Serving Size: 1 serving
- Calories: 264
- Sugar: 20 g
- Sodium: 267 mg
- Fat: 10 g
- Saturated Fat: 4 g
- Unsaturated Fat: 5 g
- Trans Fat: 0 g
- Carbohydrates: 41 g
- Fiber: 2 g
- Protein: 5 g
- Cholesterol: 31 mg


