
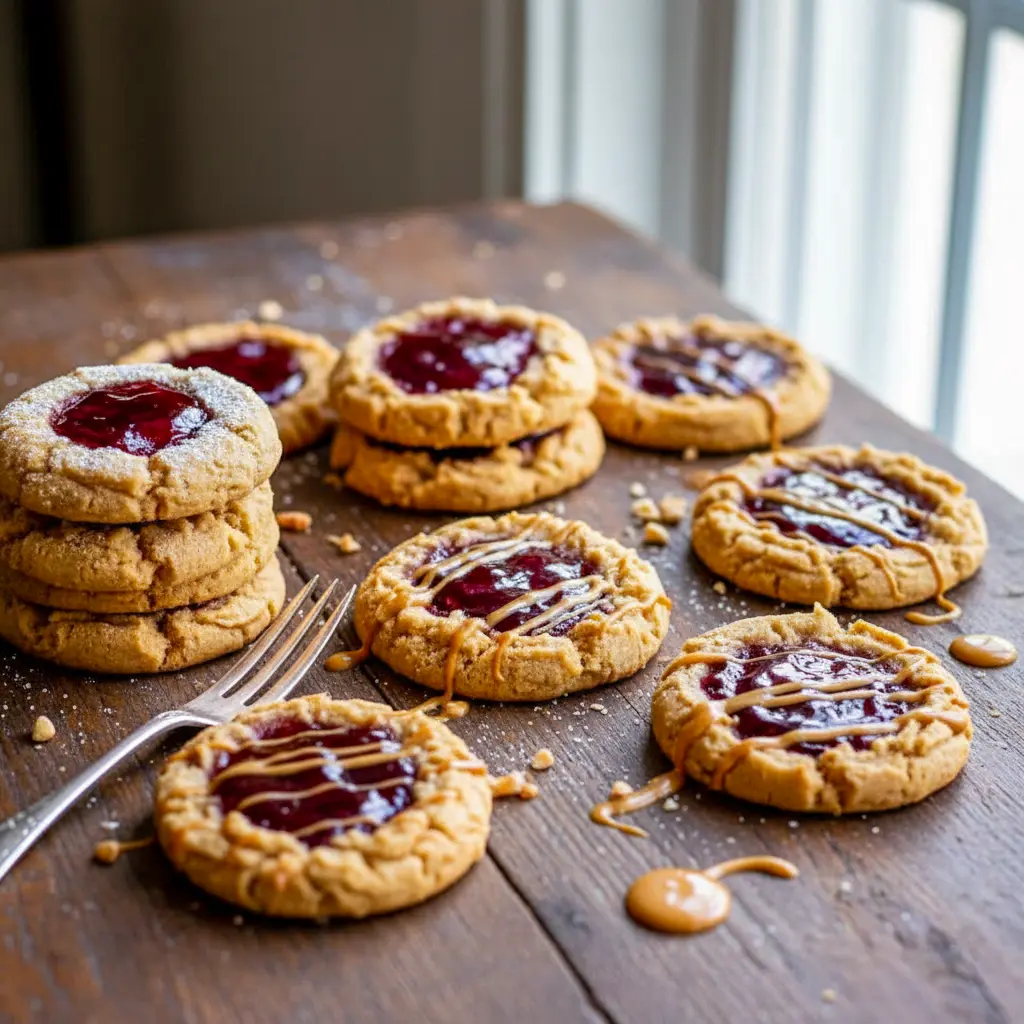
Peanut Butter and Jelly Cookies should honestly come with a warning label, because once you make a batch, you’ll start wondering why the world hasn’t collectively agreed to replace all sandwiches with dessert. I mean, we all know the magic of a classic PB&J—soft white bread, thick peanut butter, way too much jelly dripping down the sides like it’s trying to escape—but these cookies? These are the grown-up, glow-up, did-someone-just-hug-my-soul version. And they all begin with the same charm: a tender peanut butter cookie baked with a glossy, fruity center that feels like nostalgia and joy rolled into one.
And trust me…I have stories.
So picture this: me, standing on my front porch, camera in hand, feeling very official, doing my usual “cookie photoshoot” routine. The sun was perfect, the cookies were glowing like they were posing for their own magazine cover, and life felt good. That’s when FedEx Guy #1 jogs up, drops a package, and zooms off like he’s training for the cookie-reject Olympics.
“Want a cookie?” I ask.
Without slowing down, he yells over his shoulder:
“No thanks, I don’t eat sweets!”
I stood there stunned. Shocked. Offended. Concerned for his wellbeing. I don’t eat sweets??? Who just announces that like they’re stating their blood type?
Later, FedEx Guy #2 arrives. This one hesitates—like maybe he felt the cookie energy calling to him. He hands me the package, being all respectful, clearly afraid to interrupt my shoot (which, honestly, thank you sir). I offer him a cookie too.
“No, I’m good,” he says.
I pause. Look this man in the eyes.
“You’re making the wrong choice.”
And he TAKES ONE.
Victory.
Anyway—welcome to my home, where saying no to a cookie is a personal attack, and you will eventually be peer-pressured into trying something delicious. It’s for your own good.
Now let’s talk about the real stars here: these PB&J beauties.
Peanut Butter and Jelly Cookies: The Flavor You Didn’t Know You Needed
Tell me—are you like me and secretly (or not so secretly) obsessed with PB&J sandwiches? Because IMO, they’re basically one of the greatest treasures of childhood that followed us into adulthood like loyal flavor companions.
I steal bites from my kids’ sandwiches all the time. And my kids? They’re wild. They like barely-there jelly on their bread. Barely there. Can you even call that a PB&J? That’s a cry for help.
“Mom, this has too much jelly.”
Excuse me? WHO ARE YOU? Return to sender.
For me, BRING ON THE JELLY. And that’s exactly why these Peanut Butter and Jelly Cookies hit so hard. They take everything you love about a PB&J and turn it into something warm, soft, gooey, and ridiculously addictive.
What Makes This Recipe So Irresistible?
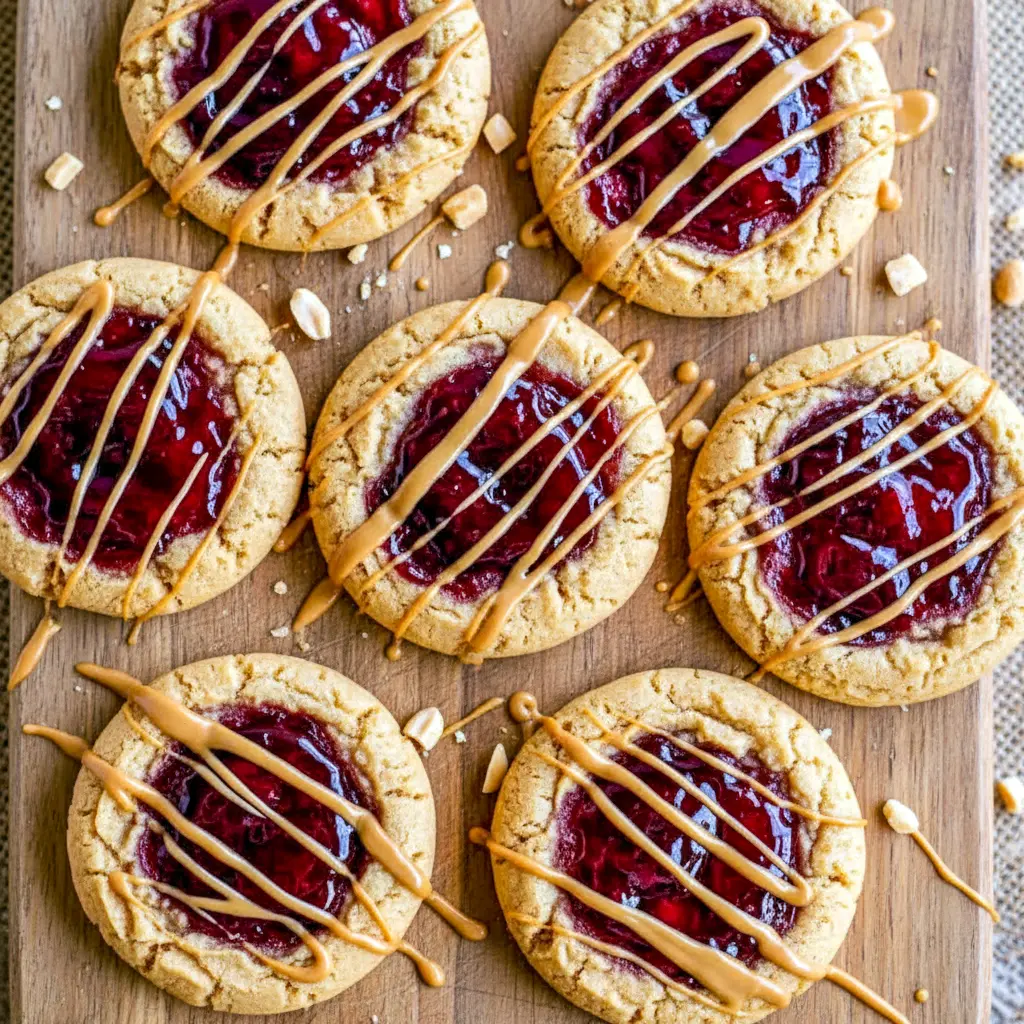
Here’s the thing—these cookies aren’t just good. They’re the kind of dessert that makes you whisper “oh my gosh” with your mouth full. They’re soft in the center, lightly crisp at the edges, and built to hold a gorgeous dollop of jam without collapsing into a sticky disaster.
A few reasons why they work so well:
- The peanut butter flavor is huge. Like, unapologetically front-and-center.
- The cookies bake with the jam already added, creating this magical melding effect that tastes like childhood comfort.
- They’re sturdy enough to hold the Best Jelly Filling For Cookies without losing their shape.
- They require zero chilling. Zero.
Bold tip: No chilling = cookies in 30 minutes.
They also fit right into the world of Jam Treats, Jam Snacks, and Sweet Cookies Recipes in the best possible way. Honestly, with 100 Types Of Cookies out there, these sit comfortably near the top of the list.
Ingredients (With Quick Notes)
Here’s the cast of characters that make these PB&J stunners shine:
- Butter — helps create the perfect soft-meets-crispy texture.
- Sugar — sweetness that balances the salty PB richness.
- Peanut Butter — creamy or crunchy! Both work.
- Eggs — structure + softness.
- Vanilla — adds depth and warmth.
- Flour — keeps it all together; nothing fancy.
- Baking Soda — lift and lightness.
- Salt — flavor booster.
- Jam or Jelly — your choice! Seedless is easiest, but any works.
This is basically a dream base for experimenting with Recipes With Jelly In It or getting creative with fun Peanut Butter Cookie Ideas.
How to Make These Peanut Butter and Jelly Cookies (The Quick Version)
Let’s hit the highlights:
- Cream the butter and sugar until smooth and fluffy.
Bold tip: Beat it longer than you think. - Mix in the peanut butter, then the eggs and vanilla.
- Add the dry ingredients and mix just until combined.
- Roll the dough into balls, then flatten with a fork for the classic PB cookie look.
- Add a teaspoon of jelly to the center of each.
- Bake until puffed and set.
- Optional: Add a fresh dab of jam after baking + drizzle with melted PB.
You now have cookies that count as Yummy Cookie Ideas, Recipes With Jelly, and the best thing you’ll eat all week.
The Story Behind the Recipe
So many cookie recipes come from tradition or some long-cherished grandma moment.
This one?
This one came from bullying delivery drivers into eating dessert.
Okay fine, that’s not the whole story.
These cookies came from my deep, unrelenting need to turn PB&J into every dessert format possible—ice cream, bars, brownies, milkshakes, and finally cookies. The idea was simple: take the soul of a peanut butter and jelly sandwich and bake it into something warm and chewy.
It took multiple rounds of testing—too soft, too crumbly, too jelly-slidey—to finally land on this version. And let me tell you…it was worth every batch.
Peanut Butter and Jelly Cookies: Pro Tips for Perfect Results
Let’s make these foolproof:
- Use seedless jam if you want smooth centers.
- Don’t overmix the dough. It leads to tough cookies.
- Add jelly after baking for a prettier look.
- If using crunchy peanut butter, embrace the chaos. It’s delicious.
- Don’t skip the fork pattern. It helps the cookie bake evenly.
- Use a cookie scoop for uniform size and perfect baking.
These tips turn a good batch into a chef’s-kiss batch worthy of any list of Yummy Cookie Ideas or Sweet Cookies Recipes.
Fun Variations to Try
One of the coolest things about these cookies is how flexible they are. Here are some ideas if you want to switch things up:
- Grape jelly for a traditional PB&J vibe
- Apricot jam for a tangy twist
- Blackberry jam for deep flavor
- Swirl two jams together for an artsy look
- Use crunchy PB to add texture
- Drizzle white chocolate on top
- Roll the dough in sugar for a sparkly finish
You could honestly make 20 flavor versions and call it your own personal list of 100 Types Of Cookies.
Best Way to Serve These Cookies
Serve them:
- Warm, so the jelly glistens and the peanut butter aroma fills the universe
- With milk (obviously, right?)
- With coffee for a surprisingly perfect combo
- In a lunchbox for a fun throwback treat
- On a dessert platter of assorted Jam Treats and Jam Snacks
These cookies shine at potlucks, parties, kid birthdays, adult birthdays, or honestly…Wednesday afternoons when you feel like you deserve a gold star.
Quick Tips for Storage & Leftovers
- Store in an airtight container for 3–4 days.
- Keep them in a single layer if possible so the jelly doesn’t smudge.
- Freeze them unbaked with the jam already added.
- Or freeze baked cookies, separating layers with parchment.
They thaw beautifully, making them awesome for meal prep or “I need a cookie NOW” emergencies.
FAQs About These Cookies
Can I use crunchy peanut butter?
Yes! It adds amazing texture.
Can I use any jelly?
Totally. If it tastes good in a sandwich, it’ll taste good here.
Do I need to chill the dough?
Nope! Bold perk: No chilling needed.
Can I double the recipe?
You absolutely should.
Will the jelly burn?
Not if you stick to 1 teaspoon. You’re good.
Final Thoughts
If you’re searching for Peanut Butter Cookie Ideas that go beyond the basic, these cookies take the trophy. They’re nostalgic, quick to make, packed with flavor, and have that irresistible Jelly Filling For Cookies that just hits different. With their soft-center, crisp-edge perfection and jammy sweetness, they fit beautifully into any collection of Sweet Cookies Recipes, Recipes With Jelly In It, or just good old-fashioned Yummy Cookie Ideas.
Bake them once and you’ll immediately understand why I practically chase down delivery drivers with them. They’re fun, they’re nostalgic, and they’re the kind of treat that makes people smile whether they’re five or fifty.
Make them today.
Eat them warm.
And don’t you dare skip the jelly.
Print

Powerfully Good Peanut Butter and Jelly Cookies with the Best Jelly Filling for Cookies
Description
Soft, rich, peanut-butter–packed cookies topped with a swirl of fruity jam? Absolute heaven. These PB&J cookies bake up tender in the center, lightly crisp on the edges, and the best part—they’re ready start-to-finish in about half an hour with zero chilling required. If you want a dessert that feels nostalgic, comforting, and insanely easy, this is the one.
Ingredients
- ½ cup (1 stick) butter, softened
- ¾ cup granulated sugar
- ¼ cup packed brown sugar
- 1 cup creamy peanut butter
- 1 large egg
- 1 tsp vanilla extract
- 1 ½ cups all-purpose flour, leveled properly
- 1 tsp baking soda
- ¼ tsp kosher salt
- ½ cup seedless jam of your choice
- Extra jam for after baking
- Warm peanut butter for drizzling
- Chopped peanuts for garnish
Instructions
- Get your oven ready.
- Set it to 350°F. Line two baking trays with parchment or silicone mats so nothing sticks.
- Cream the butter.
- Add the butter to a mixing bowl and beat until smooth and spreadable, scraping the bowl as needed.
- Sweeten the mix.
- Pour in the granulated sugar and brown sugar. Beat until the mixture is fluffy and no streaks of butter remain.
- Add the peanut butter.
- Mix in the creamy peanut butter until everything blends into a thick, uniform mixture. Crunchy peanut butter works too if you want extra texture.
- Mix in the wet ingredients.
- Beat in the egg and vanilla until smooth.
- Add the dry ingredients.
- Sprinkle the flour over the dough but don’t mix yet. Top it with the baking soda and salt. Use a spoon to lightly combine the dry ingredients on top.
- Bring the dough together.
- Turn the mixer back on and blend just until the flour disappears into the dough. Stop as soon as the mixture is cohesive.
- Overmixing = tough cookies, so keep it gentle.
- Shape the dough.
- Scoop the dough into balls roughly 1½ inches wide. Place them on the baking sheets, leaving room for spreading—these cookies expand more than standard peanut butter cookies.
- Flatten and pattern.
- Dip a fork into a bit of sugar or flour to prevent sticking, then press crisscross marks into the top of each dough ball. Press them down to about ½-inch thickness.
- Prepare the jam.
- Stir your seedless jam to smooth it out. Spoon about 1 teaspoon onto the center of each cookie, making sure it doesn’t drip over the edges.
- Bake.
- Pop the trays into the oven and bake for 13–15 minutes.
- They’re ready when the outer rims look set and just barely turning golden. Because the cookies are topped with moist jam, underbaking isn’t recommended.
- Cool the cookies.
- Let them rest on the pan for 5–10 minutes before transferring to a cooling rack. Eat at least one warm—you owe yourself that joy.
- Finish with toppings.
- For prettier cookies, add an extra dab of jam once they’ve cooled slightly. Drizzle with melted peanut butter and sprinkle with chopped peanuts if you want an extra flourish.
- Storage.
- Keeps well in an airtight container for up to 3 days.
- Freezing instructions.
- This dough freezes beautifully. Shape and flatten the dough before freezing so they’re ready to bake. Freeze in a zip-top bag, then bake from frozen—just add a couple extra minutes to the bake time.
- You can freeze them with or without the jam already added.


