
If there’s one dessert that never disappoints, it’s peanut butter paired with chocolate — and this recipe for Reese’s Peanut Butter Dessert Recipes might just be the ultimate love letter to that duo. These no-bake bars are creamy, rich, and ridiculously easy to make. No oven, no stress — just a mixing bowl, a few pantry staples, and a craving for something seriously indulgent.
Honestly, the first time I made these, I had to stop myself from “taste testing” the entire pan before they chilled. They taste just like Reese’s Bars, only thicker, fudgier, and even more satisfying. Think of them as the homemade version of your favorite peanut butter cups… but in sliceable, shareable bar form (though, between us, sharing is optional).
What Makes These Bars So Irresistible
Let’s be real — there are plenty of Simple Peanut Butter Desserts out there, but these? These are next-level. First off, they’re a Peanut Butter No Bake Dessert, which means zero waiting around for the oven to preheat or cool. You can whip them up in about 15 minutes flat.
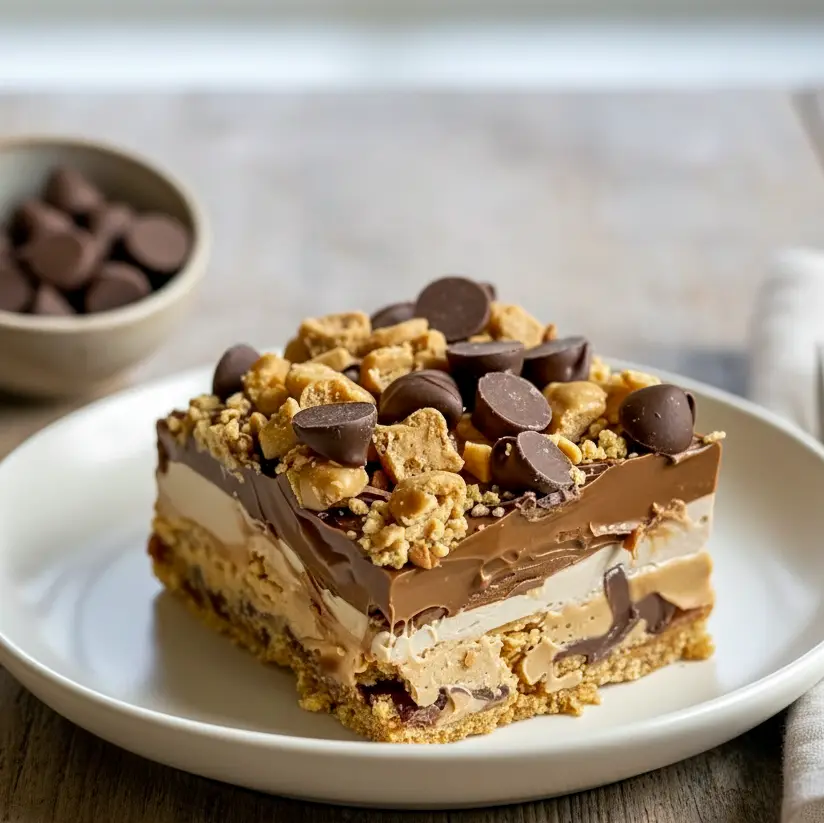
The base is buttery, slightly crunchy from the graham cracker crumbs, and loaded with creamy peanut butter goodness. Then, you pour a thick, glossy layer of melted chocolate on top that sets into the perfect crackly shell once chilled. Every bite is this magical mix of soft, creamy peanut butter and rich chocolate bliss.
They’re also totally beginner-friendly, which makes them great for baking (or, well, no-baking) with kids, or for those moments when you want a dessert that looks fancy but feels effortless.
Oh, and did I mention these bars are dangerously addictive? You’ve been warned.
The Story Behind the Recipe
So here’s a little backstory. I grew up absolutely obsessed with Reese’s peanut butter cups. Halloween? Best day ever. But as an adult, I wanted a treat that gave me that same nostalgic flavor — just a little more homemade, a little more real, and maybe (just maybe) a bit thicker on the peanut butter.
Enter these Peanut Butter Cup Bars. I first made them one summer when it was way too hot to turn on the oven, and the thought of baking cookies made me sweat just thinking about it. I had some graham crackers, a jar of peanut butter, and a bag of chocolate chips… and, well, the rest is history.
Since then, these bars have become a go-to for potlucks, holidays, and random Tuesday cravings. They’re the kind of Peanut Butter Dream Bars that make people immediately ask, “Can I get that recipe?” — which, honestly, is one of the best compliments a baker can get.
Ingredients for the Perfect No-Bake Peanut Butter Bars
Let’s break down what you’ll need. These ingredients are simple, familiar, and probably already in your pantry:
For the Peanut Butter Base:
- 1 cup (240g) creamy peanut butter – the star of the show. Go for a smooth, not natural type for best texture.
- 1 cup (225g) unsalted butter, melted – adds richness and helps the base set beautifully.
- 2 cups (250g) powdered sugar – sweetens things up and gives that classic candy-like texture.
- 2 cups (200g) graham cracker crumbs – for a light crunch and that buttery, cookie-like foundation.
For the Chocolate Topping:
- 1½ cups (260g) semisweet chocolate chips – melt beautifully and balance the sweetness perfectly.
- ½ cup (120g) creamy peanut butter – because more peanut butter is always a good idea.
That’s it. Six ingredients, zero baking, one pan of happiness.
How to Make Reese’s Peanut Butter No-Bake Bars
Step 1: Make the Base
In a large bowl, mix melted butter, peanut butter, powdered sugar, and graham cracker crumbs. Stir until it forms a smooth, slightly thick dough-like mixture. It should hold together when pressed — kind of like cookie dough, but softer.
Press it evenly into a 9×13-inch pan lined with parchment paper. Pro tip: use the back of a spoon or your hands to smooth it out evenly.
Step 2: Melt the Chocolate
In a microwave-safe bowl, combine chocolate chips and peanut butter. Microwave in 30-second bursts, stirring between each, until fully melted and silky smooth. This will be your dreamy chocolate topping.
Step 3: Assemble and Chill
Pour that molten chocolate-peanut-butter goodness right over your base. Use a spatula to smooth it evenly, making sure every inch is covered. Then, pop the pan into the fridge for at least 2 hours to set.
If you’re impatient (same), you can slide it into the freezer for about 30 minutes instead.
Step 4: Slice and Serve
Once set, remove from the fridge and let sit at room temperature for about 5 minutes before cutting. This helps prevent the chocolate from cracking. Use a sharp knife, and for clean slices, wipe the blade between each cut.
Now, grab a bar, take a bite, and prepare to fall in love.
Why This Recipe Works Every Time
Here’s why these Reeses Bars are practically foolproof:
- No oven required – perfect for hot days or quick dessert fixes.
- Familiar flavors – everyone loves the chocolate + peanut butter combo.
- Easy to customize – play with textures, sweetness, or chocolate type.
- Crowd-pleaser – ideal for parties, bake sales, or midnight snacks.
It’s one of those Desserts That Don’t Need Refrigerated right away (though keeping them cool makes them extra firm and fudgy). Basically, you can make them ahead, serve them later, and they’ll still taste like heaven.
Pro Tips for the Best Peanut Butter Bars
If you want these to come out perfect every single time, here are my tried-and-true tips:
- Use good peanut butter. The creamier, the better — and skip the “natural” kinds with oil separation, as they can make your base too soft.
- Line your pan with parchment paper. This makes removal a breeze.
- Chill before slicing. It keeps the layers neat and professional-looking.
- Run your knife under warm water before cutting. It glides through the chocolate topping like butter.
- Add toppings! Sprinkle sea salt, chopped peanuts, or shredded coconut before chilling for that gourmet touch.
A tiny sprinkle of flaky salt on top? Chef’s kiss.
Variations to Try
Once you’ve made these once, you’ll probably want to experiment (because trust me, it’s addictive). Here are some fun twists:
- Crunchy peanut butter – for extra texture.
- White or dark chocolate topping – switch it up for a new flavor vibe.
- Nut-free version – use sunflower seed butter for a safe alternative.
- Healthier take – reduce the sugar or use dark chocolate.
- Add-ins – mini pretzels, Reese’s pieces, or coconut flakes make them even more fun.
These bars can also double as Peanut Butter Savory Recipes inspiration — try adding a sprinkle of crushed sea salt or even a drizzle of chili-spiced dark chocolate for a salty-sweet twist that’s totally unique.
Best Ways to Serve
Here’s where these Peanut Butter Cup Bars shine — they’re flexible!
- As dessert: Pair with coffee or tea for an afternoon pick-me-up.
- With ice cream: They’re amazing next to vanilla or chocolate scoops.
- For gifting: Cut into squares, wrap in wax paper, and tie with twine for a homemade treat.
- On-the-go snack: Perfect for road trips or lunchbox surprises.
Basically, anytime you need something sweet, these bars deliver.
Storage & Leftover Tips
The beauty of this recipe is how well it keeps.
- Fridge: Store in an airtight container for up to a week.
- Freezer: Keep them in a sealed container for up to 3 months — they thaw beautifully.
- Room temperature: These are Desserts That Don’t Need Refrigerated for short periods (like at parties). Just keep them out of direct sunlight to prevent melting.
To serve, let frozen bars sit for about 10 minutes at room temperature, or microwave briefly if you prefer them a little softer.
Nutritional Snapshot
If you’re wondering what’s inside each delicious bite, here’s a quick peek:
- Calories: 280
- Sugar: 18g
- Fat: 19g
- Protein: 5g
- Carbs: 28g
- Fiber: 2g
- Sodium: 95mg
You can easily make swaps if you’d like a lighter or vegan version. Use coconut oil instead of butter, and dairy-free chocolate chips — still just as delicious.
FAQs About Reese’s Peanut Butter Bars
Q: Can I use natural peanut butter?
A: You can, but stir it well! The extra oil can make your bars softer, so you might want to add a bit more graham cracker crumbs for balance.
Q: My chocolate cracked when cutting — what went wrong?
A: Totally normal! Just let the bars rest at room temp for a few minutes next time before slicing.
Q: Can I make these nut-free?
A: Absolutely! Swap in sunflower seed butter — it’s a great peanut-free alternative that still gives that rich, nutty flavor.
Q: What if I don’t have graham crackers?
A: Try digestive biscuits, shortbread cookies, or even crushed vanilla wafers. They all work beautifully.
Q: Are these okay for meal prep?
A: 100%! These bars are perfect Sweet Meal Prep material — just store them in portions so you can grab and go when the sweet craving hits.
The Cozy Home Baker’s Takeaway
When it comes to Reeses Peanut Butter Dessert Recipes, this one’s a keeper. It’s simple, classic, and downright crave-worthy. The combination of buttery graham crumbs, sweet peanut butter, and silky chocolate never gets old.
It’s the kind of recipe you’ll come back to again and again — for bake sales, birthdays, or just because it’s Tuesday and you deserve a treat.
Whether you call them Peanut Butter Dream Bars, Peanut Butter No Bake Dessert, or your new “emergency chocolate fix,” one thing’s for sure: these Reese’s Bars are pure bliss in every bite.
So grab that jar of peanut butter and a mixing bowl — because honestly, dessert this easy (and this good) shouldn’t wait another minute. Print

Reese’s Peanut Butter Dessert Recipes – No-Bake Bars You’ll Crave Instantly!
- Total Time: 2 hours 10 minutes
- Yield: 16–20 bars 1x
Description
Get ready to meet your new favorite sweet indulgence. These Reese’s Peanut Butter Dessert Recipes are every peanut butter lover’s dream come true — rich, creamy, chocolatey, and best of all, no baking required. You can whip up these bars in minutes, chill them, and have a tray of irresistible treats waiting whenever that chocolate craving hits.
Each bite delivers the perfect balance of silky peanut butter, buttery graham crunch, and smooth, melt-in-your-mouth chocolate. Basically, it’s like a homemade Reese’s peanut butter cup — just bigger, bolder, and even more satisfying.
Ingredients
For the Peanut Butter Layer
- 1 cup (240g) creamy peanut butter – smooth and rich, the star flavor of the bars
- 1 cup (225g) melted unsalted butter – adds that melt-in-your-mouth texture
- 2 cups (250g) powdered sugar – for sweetness and structure
- 2 cups (200g) graham cracker crumbs – creates the perfect buttery base
For the Chocolate Layer
- 1½ cups (260g) semisweet chocolate chips – gives a luscious chocolate topping
- ½ cup (120g) creamy peanut butter – keeps the chocolate glossy and soft
Instructions
- Mix the Peanut Butter Base
- Start by grabbing a large bowl. Add in your melted butter and peanut butter, then stir until they blend together like liquid gold. Next, mix in the powdered sugar and graham cracker crumbs. Stir until everything is evenly combined and the mixture becomes thick but spreadable.
- Line a 9×13-inch baking dish with parchment paper, then press the peanut butter mixture firmly into the bottom. Smooth out the surface so it’s nice and even — that’s your base layer done!
- Melt the Chocolate Topping
- Now for the best part: the chocolate layer. Combine the chocolate chips and peanut butter in a microwave-safe bowl. Heat in 30-second bursts, stirring after each one, until the mixture turns silky and completely melted.
- If you prefer, you can also melt it over low heat on the stove using a double boiler — whichever method you find easier.
- Assemble and Chill
- Pour that shiny chocolate-peanut butter topping over the prepared base. Use a spatula to spread it evenly across the top, making sure every corner is covered.
- Pop the dish into the refrigerator for at least two hours, or until the chocolate layer is firm enough to slice.
- Slice and Enjoy
- Once set, remove the bars from the fridge and let them rest for about 5 minutes. This little wait helps the chocolate soften slightly, so it won’t crack when cutting.
- Lift the parchment paper out of the pan, transfer it to a cutting board, and slice into bars or squares. Then — the best part — dig in!
Notes
- Storage: Keep your bars in an airtight container in the fridge. They’ll stay fresh for up to a week (if they last that long!).
- Freezing: Want to save some for later? Freeze the bars in a tightly sealed container for up to three months. Just let them thaw in the fridge before serving.
- Chocolate Swaps: Love dark chocolate? Go for it! Or try milk chocolate for a sweeter twist. Both work beautifully.
- Crunch Lovers: For an extra crunch, stir in a handful of chopped peanuts or sprinkle some on top before chilling.
- Prep Time: 10 minutes
- Cook Time: 2 hours
- Category: Desserts
Nutrition
- Serving Size: 1 bar
- Calories: 280 kcal
- Sugar: 18 g
- Sodium: 95 mg
- Fat: 19 g
- Saturated Fat: 7 g
- Unsaturated Fat: 10 g
- Trans Fat: 0 g
- Carbohydrates: 28 g
- Fiber: 2 g
- Protein: 5 g
- Cholesterol: 15 mg


