
Let’s be honest — when dessert time rolls around, who really wants to turn on the oven? That’s where No Bake Dessert Recipes Easy treats like these dreamy Peanut Butter Cheesecake Bars come in to save the day (and your sanity). They’re smooth, creamy, and melt-in-your-mouth good, all without the hassle of baking. Whether you’re prepping for a holiday feast, a family get-together, or a solo midnight craving, this recipe is a total win.
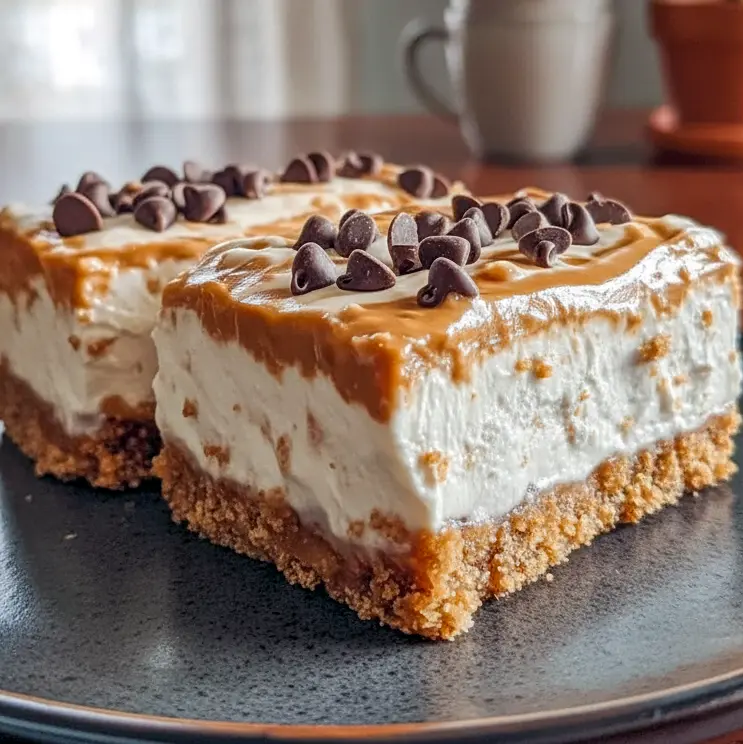
These bars are basically a love letter to peanut butter lovers everywhere — think luscious layers of creamy filling sitting on a buttery graham cracker crust, all chilled to perfection. It’s the kind of dessert that makes people pause mid-bite just to go, “Oh wow.” You know that moment.
But here’s the kicker: these bars take barely any effort. You’ll need a handful of pantry staples, a little mixing, a quick chill in the fridge, and voilà — dessert magic. Whether you’re a seasoned baker or just dipping your spoon into the world of Baking Recipes No Bake, this one is practically foolproof.
Why These Bars Are the Ultimate Treat
There’s something deeply satisfying about a dessert that feels fancy but is secretly super simple. That’s exactly what makes these Peanut Butter Pie Bars so irresistible.
- No oven, no stress. Perfect for hot days or when you just can’t deal with preheating.
- Minimal ingredients. You’ll only need a few basics — most of which are probably already in your kitchen.
- Rich, creamy, and a little salty. That sweet-salty combo hits the spot every time.
- Crowd-pleasing flavor. Peanut butter, cream cheese, and a buttery crust? Enough said.
- Perfect make-ahead dessert. They chill beautifully, which means you can prep them in advance and look like a dessert genius later.
Honestly, if there’s ever been a Dessert For After Dinner that feels indulgent but takes almost no effort, this is it.
The Ingredients That Make It So Good
To make these decadent No Bake Peanut Butter Treat bars, you’ll be working with a handful of everyday ingredients that come together like a dream team. Each one plays a crucial role in creating that creamy, crunchy perfection.
The Crust
Let’s talk about the base — the graham cracker crust. It’s buttery, slightly sweet, and gives that satisfying crunch that contrasts beautifully with the silky peanut butter filling.
You’ll need:
- Graham cracker crumbs: They add a subtle sweetness and a toasty flavor.
- Unsalted butter: Holds the crumbs together and adds richness.
- Granulated sugar: Enhances the flavor and helps the crust set perfectly.
Pro tip: Press the crust firmly into the pan — the tighter you pack it, the sturdier your bars will be later.
The Filling
This is where the magic happens. The filling is creamy, nutty, and smooth — everything you want in a Popular Dessert bar.
You’ll need:
- Cream cheese: Softened to perfection for that velvety texture.
- Peanut butter: Use creamy, not chunky, for the best consistency.
- Powdered sugar: Sweetens the filling without making it grainy.
- Vanilla extract: Adds warmth and depth of flavor.
- Heavy whipping cream: Whipped until stiff peaks form for that airy, cloud-like finish.
The whipped cream is key here — it lightens up the dense peanut butter and cream cheese combo, making the filling feel indulgent yet balanced.
Optional Topping
If you’re feeling fancy (and honestly, why not?), drizzle some melted chocolate or sprinkle crushed peanuts on top. It gives the bars that extra “wow” factor — perfect for Easy Delicious Holiday Desserts or any time you want to impress guests.
How to Make These Peanut Butter Cheesecake Bars
Making these bars is ridiculously easy, but a few smart steps can make all the difference between “pretty good” and “holy moly, this is amazing.”
Step 1: Build the Crust
In a bowl, mix together your graham cracker crumbs, melted butter, and sugar until the texture resembles damp sand. Line an 8×8-inch baking pan with parchment paper (trust me, it’ll make your life easier later), then press the mixture into the bottom until it’s compact and even. Pop it in the fridge while you prep the filling.
Step 2: Whip Up the Filling
In another bowl, beat the softened cream cheese until smooth — no lumps allowed. Add in your peanut butter and powdered sugar, and continue mixing until everything’s silky and unified. Stir in the vanilla for that cozy flavor boost.
In a separate bowl, whip your heavy cream until stiff peaks form. Gently fold the whipped cream into the peanut butter mixture with a spatula. Be patient — this step keeps your filling light and airy.
Step 3: Assemble the Bars
Pour the peanut butter cheesecake mixture over the chilled crust and spread it evenly. Smooth out the top like the dessert artist you are. If you’re going the extra mile, drizzle with melted chocolate or sprinkle some crushed peanuts on top.
Step 4: Chill and Slice
This part requires patience (ugh, I know). Let the bars chill in the fridge for at least 3 hours — overnight is even better. Once firm, lift them out using the parchment paper and cut into squares. That’s it! You’re officially the hero of dessert time.
The Story Behind This Recipe
This dessert has “nostalgia” written all over it. It reminds me of those Refrigerator Dessert Recipes my grandma used to make — the kind she’d prepare the night before family gatherings. It didn’t matter if it was the holidays, a birthday, or just a lazy Sunday; her no-bake cheesecakes always made an appearance.
The difference here is the peanut butter twist — it gives this classic comfort dessert a bold, modern upgrade. You get all the creamy, rich vibes of traditional cheesecake but without the oven drama. It’s that perfect cross between a childhood treat and an adult indulgence.
Pro Tips for Cheesecake Bar Success
Want to make sure your No Bake Dessert Recipes Easy bars come out flawless every time? Keep these pro tips in mind:
- Use room-temperature cream cheese. Cold cream cheese can lead to lumps (and nobody wants that).
- Don’t skip chilling time. It might be tempting to dive in early, but chilling helps the bars firm up and slice cleanly.
- Fold gently. When mixing the whipped cream into the peanut butter base, fold it softly to keep the filling fluffy.
- Line your pan. Parchment paper makes removal and cleanup a breeze.
- Go for high-quality peanut butter. The smoother and richer, the better the flavor.
Fun Variations to Try
The best part about Baking Recipes No Bake is how versatile they are! Here are a few ways to remix your bars:
- Chocolate swirl: Add melted chocolate to half the filling, then swirl it in for a marbled effect.
- Oreo crust: Swap graham crackers for crushed Oreos for a more chocolatey base.
- Nutty crunch: Sprinkle chopped peanuts or pretzels on top for a salty kick.
- Mini bars: Make them in muffin tins for single-serve portions.
- PB&J twist: Spread a thin layer of your favorite jam between the crust and filling for a nostalgic surprise.
Each variation keeps things exciting while still holding onto that creamy, peanut buttery core.
Best Way to Serve
Serve these chilled — they’re at their absolute best when cold and firm. Pair them with a cup of coffee or a glass of milk for that perfect Dessert For After Dinner moment. If you’re feeling fancy, drizzle a little chocolate sauce or caramel over the top before serving. Bonus points if you add a sprinkle of flaky sea salt for that sweet-salty pop.
Storage Tips
These bars are make-ahead friendly, which makes them ideal for Easy Delicious Holiday Desserts or parties.
- In the fridge: Store covered for up to 5 days.
- In the freezer: Freeze individual slices wrapped in plastic wrap for up to a month. Let them thaw in the fridge overnight before serving.
FYI, they taste amazing straight out of the fridge — creamy, cold, and just sweet enough.
FAQs About No Bake Peanut Butter Cheesecake Bars
Can I use crunchy peanut butter?
Sure, if you love extra texture. Just note that it’ll make the filling a bit denser.
My crust is crumbly — what happened?
You probably didn’t press it firmly enough or used too little butter. Make sure to compact it well before chilling.
Can I make this ahead for a party?
Absolutely! These bars are even better after chilling overnight, so they’re a perfect Refrigerator Dessert Recipes option.
What if I don’t have heavy cream?
You can use whipped topping in a pinch. The texture will be slightly different but still delicious.
Can I skip the crust?
Technically yes, but the crust adds a crucial crunch that balances the creamy filling. You’d miss it if it’s gone!
Final Thoughts
If you’re on the hunt for a Simple Joy that tastes like it took hours to make, these No Bake Peanut Butter Cheesecake Bars are your new go-to. They’re creamy, dreamy, and just the right mix of sweet and salty. Perfect for holidays, summer parties, or whenever you want to treat yourself without turning on the oven.
Whether you call them Peanut Butter Pie Bars, a No Bake Peanut Butter Treat, or simply “the best thing I’ve ever made,” one thing’s for sure — you’ll be making them again and again. Because honestly? Dessert should be this easy and this good. Print

No Bake Dessert Recipes Easy – Dreamy Peanut Butter Cheesecake Bars!
- Total Time: 20 minutes
- Yield: 12 servings 1x
Description
Looking for a no-fuss dessert that still feels decadent enough for guests (or a solo treat-yourself night)? These No Bake Peanut Butter Cheesecake Bars are a total game changer. Imagine a buttery graham cracker base topped with layers of creamy, peanut-buttery bliss — no oven, no stress, just pure dessert magic. Whether you’re making them for a holiday spread or a chill night in, these bars come together fast and taste like you spent hours baking. Bonus: a drizzle of melted chocolate on top takes them from “yum” to absolutely irresistible.
Ingredients
- 1 ½ cups graham cracker crumbs
- 6 tablespoons unsalted butter, melted
- ¼ cup granulated sugar
- 16 oz cream cheese, softened to room temperature
- ¾ cup creamy peanut butter
- 1 cup powdered sugar
- 1 teaspoon vanilla extract
- 1 cup heavy whipping cream
- ½ cup semi-sweet chocolate chips (optional, for topping)
Instructions
- Make the crust.
- Combine the graham cracker crumbs, melted butter, and sugar in a medium bowl. Stir until everything looks evenly coated — the texture should remind you of damp sand.
- Press and chill.
- Line a 9×9-inch baking pan with parchment paper. Pour the crumb mixture in and press it down firmly using the back of a spoon or a flat-bottomed cup. Pop it in the fridge for a bit while you whip up the filling.
- Mix the filling.
- In a large bowl, beat the softened cream cheese until smooth and fluffy. Add the peanut butter, powdered sugar, and vanilla extract. Keep mixing until the mixture turns creamy and luscious — you’ll want to dive right in!
- Whip the cream.
- In a separate bowl, whip the heavy cream until stiff peaks form. This step gives your cheesecake that light, airy texture that melts in your mouth.
- Combine the goodness.
- Gently fold the whipped cream into the peanut butter mixture. Don’t rush this step — the goal is to keep it light and fluffy.
- Assemble the bars.
- Spread the peanut butter cheesecake filling evenly over your chilled crust. Smooth the top with a spatula until it looks silky and irresistible.
- Add a little flair (optional).
- Sprinkle or drizzle melted semi-sweet chocolate chips on top if you’re feeling fancy. It adds a perfect balance of sweetness and texture.
- Chill to perfection.
- Cover the pan and refrigerate for at least 4 hours (overnight is even better). This helps everything set beautifully.
- Slice and serve.
- Once firm, lift the bars out using the parchment paper, cut into neat squares, and serve cold. Prepare for a round of “OMG, these are amazing!”
Notes
- Crust control: If you love a thicker crust, add an extra ¼ cup of graham cracker crumbs.
- Peanut butter matters: Use creamy peanut butter — natural versions can be too oily for this recipe.
- Patience pays off: Letting the bars chill fully makes a huge difference in texture.
- Prep Time: 20 minutes
- Category: Desserts


